How to Add External Data to User JWT in Keycloak
If you have Keycloak integrated into your application, you’ve probably faced a situation where you need some data from a remote endpoint in the user token, like custom roles. This guide will show you how to include external data in a user JWT using Keycloak.
Let’s assume you have a remote data source and you want this data included in the user token. In this guide, I will mock an external API using Mockserver. My example will contain two services: Keycloak and Mockserver (external API).
Keycloak has a set of embedded tools to connect external user accounts and data providers. However, these tools don’t always fit external APIs and require a lot of OpenID protocol details to be implemented. The simplest way to get custom data into a user token is to use a protocol mapper. Keycloak has a set of built-in mappers, but there are no mappers that can call external endpoints.
In this guide, I’m going to use a custom protocol mapper with that functionality implemented.
Steps Overview
- Set up the environment with Keycloak, Mockserver, and PostgreSQL.
- Configure the external claim mapper in Keycloak.
- Test the configuration and view the results in the token.
Test Environment Setup
Let’s prepare the environment for testing the mapper. To get Keycloak with the keycloak-external-claim-mapper added, I’m going to create a Dockerfile with the following content:
FROM alpine:3.20 as build

ARG VERSION=0.0.2

RUN \
  wget https://github.com/zloom/keycloak-external-claim-mapper/releases/download/${VERSION}/external.claim.mapper-${VERSION}.tar.gz;\
  mkdir -p /providers;\
  tar -C /providers -zxvf external.claim.mapper-${VERSION}.tar.gz;

FROM quay.io/keycloak/keycloak:25.0.0 as keycloak

COPY --from=build /build /opt/keycloak/providers
We need to spin up the external API mock, Keycloak, and a database, so let’s use Docker Compose. Below is the content for docker-compose.yaml:
version: "3"

services:
  postgres:
    container_name: postgres
    image: postgres:14.13
    environment:
      POSTGRES_DB: 'keycloak'
      POSTGRES_USER: 'keycloak'
      POSTGRES_PASSWORD: 'keycloak'
    ports:
      - 5432:5432
    volumes:
      - ./postgres/data:/var/lib/postgresql/data

  keycloak:
    container_name: keycloak
    build:
      context: .
      dockerfile: Dockerfile
    environment:
      KEYCLOAK_ADMIN: 'admin'
      KEYCLOAK_ADMIN_PASSWORD: 'admin'
      KC_DB: 'postgres'
      KC_DB_URL: 'jdbc:postgresql://postgres:5432/keycloak'
      KC_DB_USERNAME: 'keycloak'
      KC_DB_PASSWORD: 'keycloak'
    command: start-dev
    ports:
      - 8080:8080
    depends_on:
      - postgres

  mockserver:
    container_name: mockserver
    image: mockserver/mockserver:5.15.0
    environment:
      MOCKSERVER_INITIALIZATION_JSON_PATH: /mockserver/initializer.json
      SERVER_PORT: 8081
    ports:
      - 8081:8081
    volumes:
      - ./initializer.json:/mockserver/initializer.json
Mockserver requires configuration, so I will create initializer.json with the following mock configuration:
[
  {
    "httpRequest": {
      "path": "/userprofile"
    },
    "httpResponse": {
      "statusCode": 200,
      "headers": {
        "content-type": [
          "application/json"
        ]
      },
      "body": {
        "roles": {
          "values": [
            "role1",
            "role2",
            "role3"
          ]
        }
      }
    }
  }
]
After creating all these files, you should have a ready folder with three files: Dockerfile, docker-compose.yaml, and initializer.json. Switch to this folder and run docker compose up -d wait when all containers started and open http://http://localhost:8080/ in browser you should see keycloak login window.
Keycloak configuration
Protocol mappers are grouped with client scopes. In fact, a Keycloak client scope is a set of JWT mappers. A single scope can be assigned to multiple clients. Also, each client has its own scope called ${client-name}-dedicated.
- Go to http://localhost:8080, and log in with the username and password admin.
- Open Clients from the left menu.
- Open the
accountclient, and in the Capability config section, check the Direct access grants box. Click the save button. - Switch to the Clients Scopes tab, open
account-dedicated, and in the Mappers tab, click the Configure a new mapper button. - Select External claim mapper and set the following values:
- Name:
test - Remote url:
http://mockserver:8081/userprofile - Request headers: Key
Content-Type, Value:application/json - Token Claim Name:
test - Claim JSON Type:
JSON
- Name:
- Click the save button
Testing the Mapper
You can test that the mapper sends a request to the remote endpoint using the following curl statement:
curl 'http://localhost:8080/realms/master/protocol/openid-connect/token'  \
  -H 'Content-Type: application/x-www-form-urlencoded' \
  --data-urlencode 'client_id=account' \
  --data-urlencode 'grant_type=password' \
  --data-urlencode 'username=admin' \
  --data-urlencode 'password=admin'
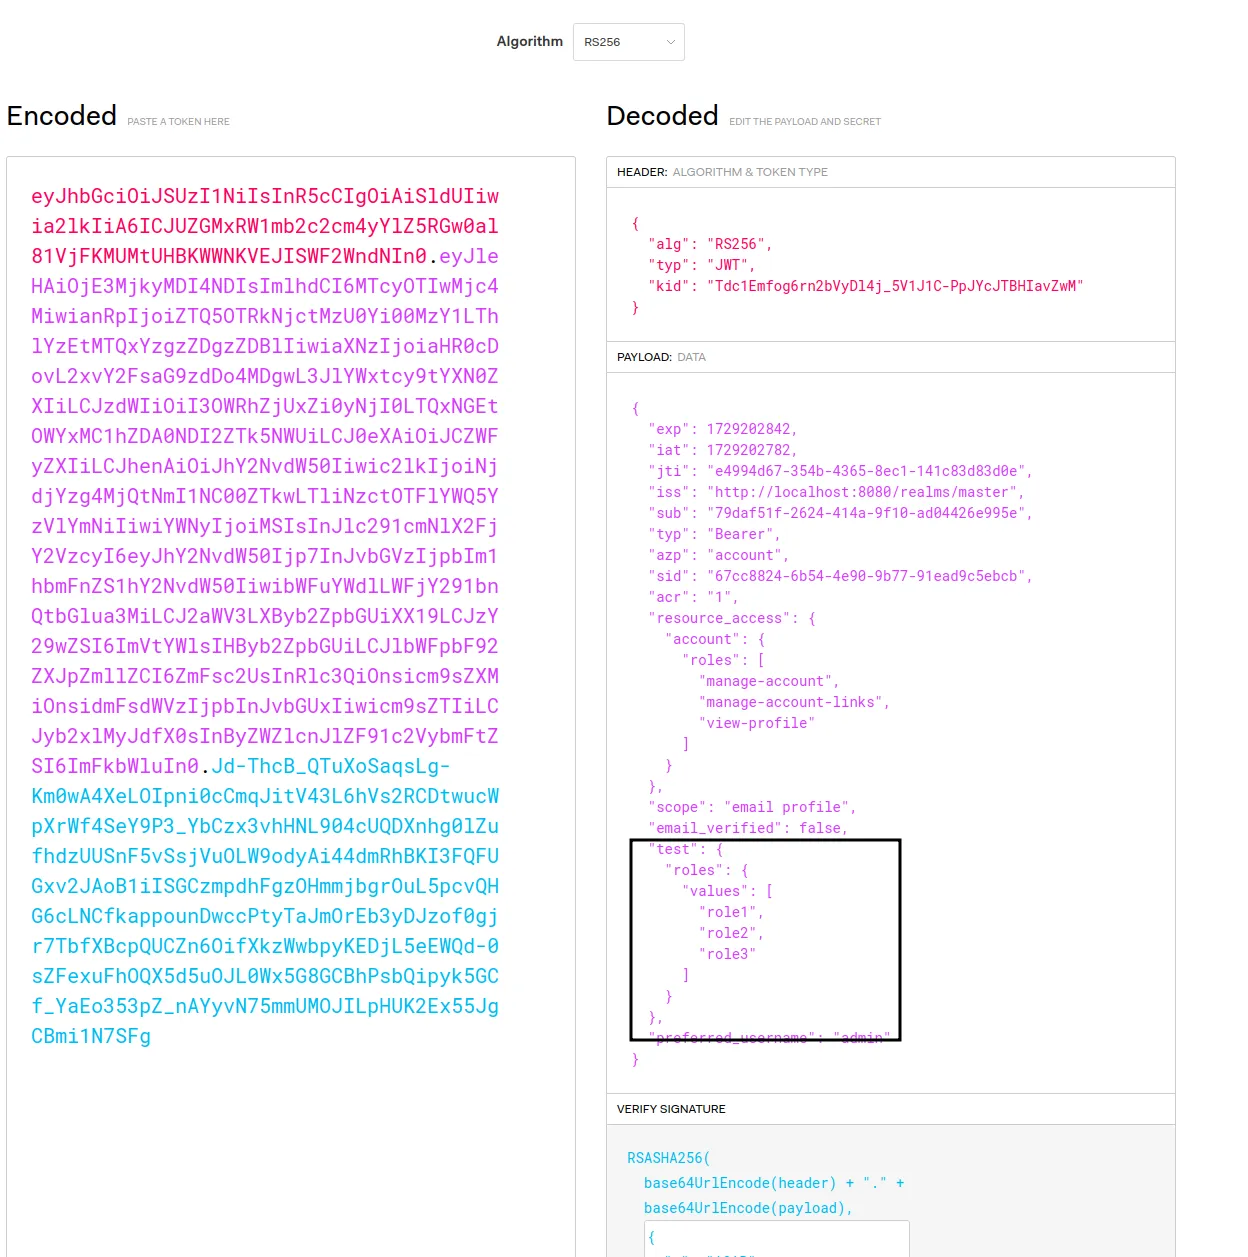
This request should give you a valid token with the data from the remote endpoint:
{
   "access_token" : "eyJhbGciOiJSUzI1NiIsInR5cCIgOiAiSldUIiwia2lkIiA6ICJUZGMxRW1mb2c2cm4yYlZ5RGw0al81VjFKMUMtUHBKWWNKVEJISWF2WndNIn0.eyJleHAiOjE3MjkyMDI4NDIsImlhdCI6MTcyOTIwMjc4MiwianRpIjoiZTQ5OTRkNjctMzU0Yi00MzY1LThlYzEtMTQxYzgzZDgzZDBlIiwiaXNzIjoiaHR0cDovL2xvY2FsaG9zdDo4MDgwL3JlYWxtcy9tYXN0ZXIiLCJzdWIiOiI3OWRhZjUxZi0yNjI0LTQxNGEtOWYxMC1hZDA0NDI2ZTk5NWUiLCJ0eXAiOiJCZWFyZXIiLCJhenAiOiJhY2NvdW50Iiwic2lkIjoiNjdjYzg4MjQtNmI1NC00ZTkwLTliNzctOTFlYWQ5YzVlYmNiIiwiYWNyIjoiMSIsInJlc291cmNlX2FjY2VzcyI6eyJhY2NvdW50Ijp7InJvbGVzIjpbIm1hbmFnZS1hY2NvdW50IiwibWFuYWdlLWFjY291bnQtbGlua3MiLCJ2aWV3LXByb2ZpbGUiXX19LCJzY29wZSI6ImVtYWlsIHByb2ZpbGUiLCJlbWFpbF92ZXJpZmllZCI6ZmFsc2UsInRlc3QiOnsicm9sZXMiOnsidmFsdWVzIjpbInJvbGUxIiwicm9sZTIiLCJyb2xlMyJdfX0sInByZWZlcnJlZF91c2VybmFtZSI6ImFkbWluIn0.Jd-ThcB_QTuXoSaqsLg-Km0wA4XeLOIpni0cCmqJitV43L6hVs2RCDtwucWpXrWf4SeY9P3_YbCzx3vhHNL904cUQDXnhg0lZufhdzUUSnF5vSsjVuOLW9odyAi44dmRhBKI3FQFUGxv2JAoB1iISGCzmpdhFgzOHmmjbgrOuL5pcvQHG6cLNCfkappounDwccPtyTaJmOrEb3yDJzof0gjr7TbfXBcpQUCZn6OifXkzWwbpyKEDjL5eEWQd-0sZFexuFhOQX5d5uOJL0Wx5G8GCBhPsbQipyk5GCf_YaEo353pZ_nAYyvN75mmUMOJILpHUK2Ex55JgCBmi1N7SFg",
   "expires_in" : 60,
   "not-before-policy" : 0,
   "refresh_expires_in" : 1800,
   "refresh_token" : "eyJhbGciOiJIUzUxMiIsInR5cCIgOiAiSldUIiwia2lkIiA6ICJmZmFkYjdiMy00Nzg3LTRhYjAtYWI2ZS0yMmExZDM0YjBmNTIifQ.eyJleHAiOjE3MjkyMDQ1ODIsImlhdCI6MTcyOTIwMjc4MiwianRpIjoiOTZkOWRiNGMtOGZkOC00MDI1LTgyNjItZDNmYmIzODg0YTQxIiwiaXNzIjoiaHR0cDovL2xvY2FsaG9zdDo4MDgwL3JlYWxtcy9tYXN0ZXIiLCJhdWQiOiJodHRwOi8vbG9jYWxob3N0OjgwODAvcmVhbG1zL21hc3RlciIsInN1YiI6Ijc5ZGFmNTFmLTI2MjQtNDE0YS05ZjEwLWFkMDQ0MjZlOTk1ZSIsInR5cCI6IlJlZnJlc2giLCJhenAiOiJhY2NvdW50Iiwic2lkIjoiNjdjYzg4MjQtNmI1NC00ZTkwLTliNzctOTFlYWQ5YzVlYmNiIiwic2NvcGUiOiJiYXNpYyB3ZWItb3JpZ2lucyBlbWFpbCBwcm9maWxlIHJvbGVzIGFjciJ9.BQJPApuQ_-krRMBPP8vuwDyD1L9BJCxrhP4-BujYGbT4bWu8NRLAEJssYdg1e7yk6ajJxXeP6-pbk2tpYvgOCQ",
   "scope" : "email profile",
   "session_state" : "67cc8824-6b54-4e90-9b77-91ead9c5ebcb",
   "token_type" : "Bearer"
}
Decoded token holds additinal claims:

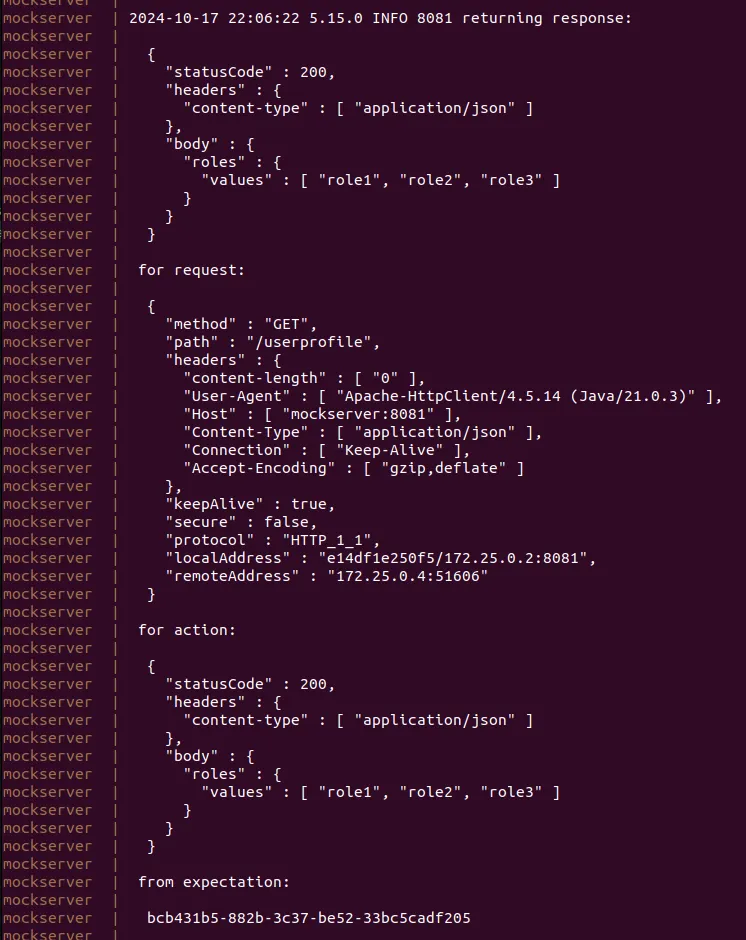
You can see keycloak request logs in mockserver container:
